
Plaster damage can make even a clean room look neglected. Small cracks spread over time, peeling areas become messy, and damaged ceilings may lead to bigger repair costs later. Many homeowners ignore these signs until the surface starts falling apart. This plaster repair guide explains how to repair plaster walls without making the job complicated. You will learn simple repair methods, tools to use, and ways to handle common wall and ceiling problems. Whether you are fixing hairline cracks or repairing damaged plaster walls, the right method keeps the surface smooth and long lasting.
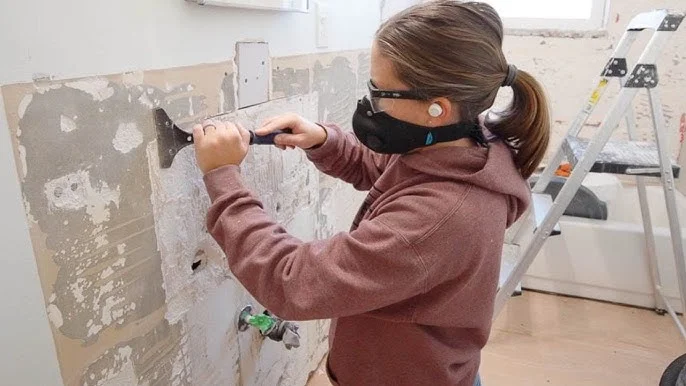
Plaster damage appears for different reasons. Older homes usually develop cracks because walls shift slowly over time. Moisture damage is another common reason, especially in kitchens, bathrooms, and ceilings near leaking pipes. Poor ventilation can also weaken plaster surfaces and cause peeling. Temperature changes affect plaster as well. Heat and cold make materials expand and shrink, leading to visible cracks near windows and corners. In some cases, low quality repair work creates weak spots that fail after a short period. Knowing the cause helps you choose the right plaster repair method before the problem spreads further.
Different plaster issues need different repair methods. Some damage stays on the surface while other problems reach deeper layers behind the wall. Understanding the condition first prevents wasted effort and poor finishing.
Small cracks near doors and windows usually happen because of building movement. These cracks often return if they are covered without proper preparation. Start by widening the crack slightly with a scraper so the filler can bond correctly. Dust should be removed before applying any patching compound. For plaster wall crack repair, flexible filler works better than standard compounds because it handles slight movement. After the filler dries, sand the area carefully and repaint the surface. Thin cracks may seem harmless, but repairing them early keeps the plaster stronger over time.
Peeling plaster often points to trapped moisture or weak bonding underneath the surface. Loose sections should never be painted over because the damage continues spreading behind the finish. Press gently around the damaged spot to locate hollow areas before starting repairs. To handle peeling surfaces, remove unstable plaster with a putty knife and clean the wall properly. Primer helps the new layer stick evenly and prevents future peeling. Many people rush this stage, but surface preparation decides how long the repair lasts.
Ceiling damage usually comes from roof leaks, plumbing issues, or poor insulation. Water weakens plaster and creates stains, sagging spots, and surface bubbles. Ignoring ceiling damage can eventually lead to sections collapsing. Plaster ceiling repair methods start with fixing the moisture source first. Damaged plaster should be removed completely until the solid surface appears underneath. Once dry, apply fresh plaster in thin layers instead of one thick coat. This reduces cracking and creates a cleaner finish after sanding.
DIY plaster repair becomes easier with proper tools. Using incorrect equipment often creates rough surfaces and uneven patches that stand out after painting. Basic plaster work does not require expensive equipment, but quality tools improve the final result. You will need a putty knife, sanding block, plaster filler, utility knife, primer, and protective sheets for nearby furniture. A dust mask also helps while sanding old plaster walls. Keeping tools clean during the repair process prevents lumps and rough marks on the finished surface.
Repairing plaster walls takes patience more than strength. Careful preparation and smooth application produce better results than rushing through the process. Each stage supports the next one, so skipping steps often creates visible flaws later.
Before applying filler, the damaged section should be completely clean. Dust, loose plaster, and paint chips stop proper bonding and weaken the repair area. Use a scraper to remove unstable material and wipe the surface with a dry cloth afterward. Deep cracks may require mesh tape for additional support. This keeps the repaired section from reopening after drying. Cleaning also helps you see the full extent of the damage before starting repairs, especially on old plaster wall surfaces.
Applying filler evenly is one of the most important parts of plaster repair step by step. Small amounts work better than thick layers because they dry more consistently and reduce shrinkage cracks. Spread the filler smoothly with a putty knife and feather the edges outward. Some repairs need two or three coats for a flat finish. Allow each layer to dry fully before applying the next one. Rushing the drying process often leaves soft spots under the surface and weakens the repair quality.
Once the filler dries completely, sanding smooths the repair area and blends it with the surrounding wall. Use fine grit sandpaper to avoid scratching the plaster surface. Gentle pressure usually produces cleaner results than aggressive sanding. After sanding, wipe away dust before painting or priming. A smooth finish helps paint match evenly across the repaired wall. Proper finishing also makes the repair less noticeable under natural lighting.
Ceiling plaster repairs require extra attention because gravity affects the material differently than wall repairs. Loose ceiling plaster should always be removed carefully to avoid injuries and uneven patching later. Safety glasses help protect against falling debris during the process. For larger damaged sections, plasterboard patches may support the repair area better than filler alone. Thin plaster layers dry more securely on ceilings and reduce sagging. Once dry, sanding and repainting complete the repair and restore a cleaner appearance.
People often ask how to fix peeling plaster without replacing the entire wall. In many cases, damaged sections can be repaired successfully if moisture problems are solved first. Covering peeling plaster without fixing the source usually causes the issue to return quickly. Remove all loose material before applying primer and fresh plaster compound. Strong bonding primer improves adhesion and prevents uneven drying. Smooth application and proper sanding help the repaired section blend naturally with the surrounding wall surface.
Old plaster wall repair requires a careful approach because aged surfaces become brittle over time. Heavy scraping or rough sanding may create larger cracks and weaken nearby sections. Testing a small area first helps avoid unnecessary damage. Traditional lime plaster walls may also react differently than modern plaster materials. Matching the repair compound with the original surface creates better durability and appearance. Older homes often need slower drying times because thick plaster layers hold moisture longer than modern drywall.
Many plaster repairs fail because of simple mistakes during preparation or drying. Applying filler over dust or damp surfaces weakens bonding and causes cracking later. Thick plaster layers also dry unevenly and create visible shrinking marks. Another common mistake is painting before repairs fully dry. Moisture trapped under paint can damage the surface again within weeks. Sanding too aggressively also leaves uneven textures that become obvious under bright lighting.
Some plaster problems go beyond simple DIY repair work. Large ceiling cracks, major water damage, or repeated wall movement may point to structural issues underneath the plaster surface. Professional inspection helps identify hidden damage before repairs continue. Experienced contractors also handle decorative plaster designs and deep structural repairs more safely. While small repairs are manageable for most homeowners, larger damaged sections may require professional tools and advanced repair techniques.
Plaster damage may look difficult at first, but many problems can be repaired with the right process and patience. Small cracks, peeling surfaces, and damaged ceilings often improve with proper preparation and careful application. Good repairs depend more on steady work than expensive tools. This plaster repair guide covered wall cracks, peeling plaster, ceiling repairs, and old plaster wall repair methods. If you want cleaner walls and longer lasting surfaces, start repairs early before the damage spreads further. You can also read more home improvement guides to improve painting, wall finishing, and interior maintenance skills.



(734) 368-5568
info@drywallcompleteservices.com
1830 Carol Ann Ave, Ypsilanti, MI 48198